Howto connect a Laser

If you have a question about the software please ask it here.

Re: Howto connect a Laser

Postby Gazza » Fri Dec 22, 2017 10:32 am

dezsoe wrote:We are talking about everything in the world, but none of us recognised that it is an Arduino Nano controlled 2 axis + laser on/off board! :) It is a complete solution with its PC side software. So, Gazza, the question is:

- Did you build the whole stuff or just bought the controller with the laser?
- Do you have a complete machine to fix the laser on as only a laser module?

If you want to replace the Arduino Nano with UCCNC, you have to pull out everything from the main board (also the Nano and the 2 axis controllers!) and start to find the pins for the axes step and dir, the enable and the laser output. (If the PC side program has these infos, then you are ready with this part.) Then make a cable or a little board to connect to the UCxxx controller you have instead of the Nano. Then it will work after you set up UCCNC.


my workshop with a 1mtr x 500 bed..( ps loving retirement but hate re learning LOL )

Image

and the baby one...Yes a full kit but i want to replace the KRESS ROUTER with the LASER
Gazza
 
Posts: 33
Joined: Tue Dec 19, 2017 7:33 pm
Location: Hiding in me work shop playing in England

Re: Howto connect a Laser

Postby Gazza » Fri Dec 22, 2017 10:35 am

Robertspark wrote:I think his intention is to bin the board and use a UC motion controller (not sure which one??)

+ a cheap BoB as given in one of the earlier posts.

https://cnc4you.co.uk/resources/KK01.pdf

THIS IS NOT CHEAP BUT A VERY GOOD BOARD FROM CNC 4 YOU https://cnc4you.co.uk/

i.e. uccnc will control the axis + laser.

on that bob is a relay, use the relay to toggle the laser. (pins marked NO + COM) YES

I'd suggest starting out using M3/M5 to toggle the laser on and off.

UCCNC has a more "advanced" laser control although I'd suggest that you don't use it because you will need to use overburn codes to get best use of the M10/M11 functionality.

you will need to buy 3x stepper motor drives in order for your stepper motors to be controlled.
you will also need a power supply which is compatible with your drives.

You will need to try to find out the specifications for the drives (ampage, and mH), this can normally be found via google if there is a part number on them (or you can roughly estimate it if you can find one of similar dimensions).

My experience, cleaper the drives, the poorer the finish you end up with.... but that is your choice.... then again those drives do not look exactly likely to have much of a current rating hence something cheap will probably work fine.

{I have a set of unused TB6066 drives + BoB + power supply you can probably use.... where are you roughly?}
such as these:
http://www.haoyuelectronics.com/Attachm ... dule-1.jpg
http://www.mycncuk.com/attachment.php?a ... 1495398422
They are sat in a box and won't be used
I'll have to check on the power supply.... but you may be able to use the one within your present setup.

It may be possible to remove the arduino board and plug in some fly leads so that you can use the existing drives.... the catch is you need to work out which pins are the step + direct pins on that Board you posted in one of the first posts.
http://img.banggood.com/images/oaupload ... b4f8a8.jpg
It all depends how much you want to tinker and if you just want it to work..... quick + easy as possible.
Gazza
 
Posts: 33
Joined: Tue Dec 19, 2017 7:33 pm
Location: Hiding in me work shop playing in England

Re: Howto connect a Laser

Postby Gazza » Fri Dec 22, 2017 11:44 am

..

See laser this is what started it all LOL

Image

so with above screen connect laser to next to pictures below ?

Image

Image


and with the laser power pack opened up we see this

the power to the laser
Image

Image

and cutting out my model planes

Image
Gazza
 
Posts: 33
Joined: Tue Dec 19, 2017 7:33 pm
Location: Hiding in me work shop playing in England

Re: Howto connect a Laser

Postby dezsoe » Fri Dec 22, 2017 3:13 pm

Gazza,

Now you have 2 machines. Is the KK01 already connected to the bigger machine? If it is, then you just have to find an unused output to drive the laser. I do not recommend the relay output as it is a bit slow, so turn on and off will not happen in that moment when the g-code requires. To have exact timing, you have to use M10/M11 to turn on/off the laser. On the other side, the relay has 10 and 5 ms max. delay to turn on and off. (See relay manual.) I recommend to set the laser output pin in UCCNC and use it with a resistor and a FET (or the original board without the daughter boards) to switch the laser.
dezsoe
 
Posts: 2093
Joined: Sun Mar 12, 2017 4:41 pm
Location: Csörög, Hungary

Re: Howto connect a Laser

Postby Gazza » Fri Dec 22, 2017 3:55 pm

Yes the kk01 board is working the bigger machine.....
so connect a fet and resistor from where to where a... I can follow a drawing no problem if you can draw it I can build it.... LoL
Gazza
 
Posts: 33
Joined: Tue Dec 19, 2017 7:33 pm
Location: Hiding in me work shop playing in England

Re: Howto connect a Laser

Postby Gazza » Fri Dec 22, 2017 4:15 pm

Now here is something VERY INTERESTING
..
Scroll down till you come to the UCCNC setup

WOW

https://jtechphotonics.com/?page_id=3905
Gazza
 
Posts: 33
Joined: Tue Dec 19, 2017 7:33 pm
Location: Hiding in me work shop playing in England

Re: Howto connect a Laser

Postby dezsoe » Fri Dec 22, 2017 4:50 pm

What is interesting there? (I did not read all, just scrolled.) Maybe, that can be interesting, that they even mention the M3 relay to turn laser on/off (I still don't recommend it) and on the screenshots they left the M3 (and all the other) delay set to 1000 ms. That means, you run a program to cut something, the laser turns on, waits 1 s (!), burns everything below it, and then starts to move. Hm... Not bad, but there are some development opportunities. :) I wrote a pm to somebody on an other forum to get some technical data from this board. When I get the answer, I'll reply you here.
dezsoe
 
Posts: 2093
Joined: Sun Mar 12, 2017 4:41 pm
Location: Csörög, Hungary

Re: Howto connect a Laser

Postby dezsoe » Fri Dec 22, 2017 5:03 pm

OK, I read a bit. The author recommends to use the laser as a PWM controlled spindle.
1. You have the 2-wire laser, no PWM control.
2. As I wrote the laser output is better in timing.
3. If you have both the spindle and the laser on the machnie, they can be connected. The only thing you have to remember is to turn off the spindle (not in UCCNC, but on itself or somewhere on the cable), because the M10 will only turn on the laser when M3 is also on.
dezsoe
 
Posts: 2093
Joined: Sun Mar 12, 2017 4:41 pm
Location: Csörög, Hungary

Re: Howto connect a Laser

Postby Gazza » Fri Dec 22, 2017 7:05 pm

dezsoe wrote:OK, I read a bit. The author recommends to use the laser as a PWM controlled spindle.
1. You have the 2-wire laser, no PWM control.
2. As I wrote the laser output is better in timing.
3. If you have both the spindle and the laser on the machnie, they can be connected. The only thing you have to remember is to turn off the spindle (not in UCCNC, but on itself or somewhere on the cable), because the M10 will only turn on the laser when M3 is also on.

For ON/OFF relay control:

Uncheck the box on “PWM spindle” and check the “Spindle relay output enabled”.
Set M3 relay pin to “1” and port to “1”. This will map to the stepcraft Pin 13 that you have connected to the laser driver.
You can now turn on and off your laser with the “M3” command. Test it on the run screen by pushing the clockwise spindle button.
Gazza
 
Posts: 33
Joined: Tue Dec 19, 2017 7:33 pm
Location: Hiding in me work shop playing in England

Re: Howto connect a Laser

Postby Gazza » Sat Sep 22, 2018 3:26 pm

Hi All

Been some time I had a lot on my plate due to ill health ..but back and ready to try again
well I had loads of problems trying to connect that chinese laser ( 2 wire )
So I gave up and now on the way from USA

A 3 wire version so we have 12v pos and neg and now a 3rd wire that is PMW
so using the CNC 4 You KK01 board

Note im not using any other system like steppercraft etc..... just the unccnc KK01

Image

any way trying to get my head round this ...is it this simple ?

Below taken from another site

https://jtechphotonics.com/?page_id=3905

UCCNC Setup
Many people are using the UC100 and the UCCNC software to run their machine. Here is the quick guide to setting up the machine.

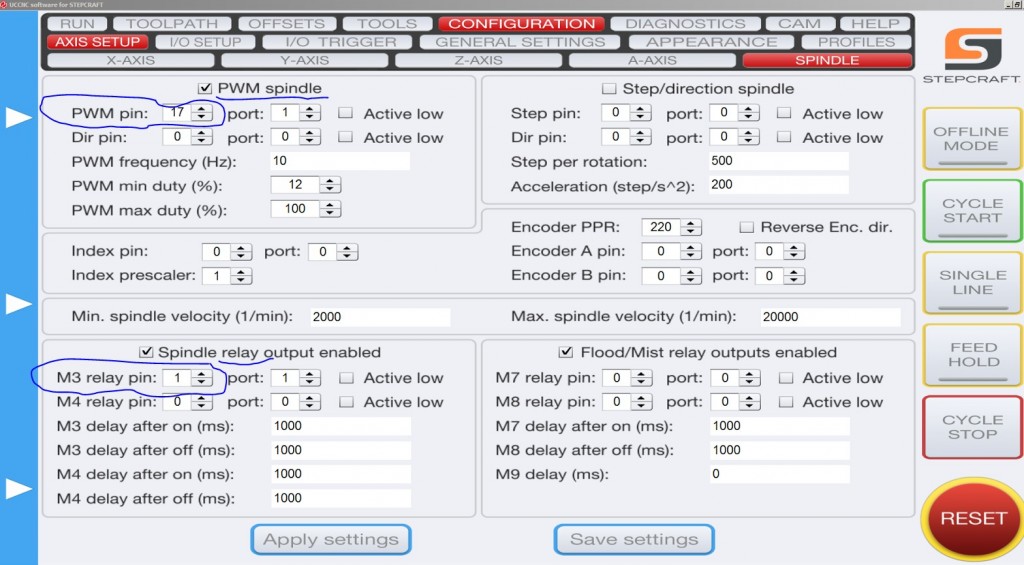
You will need to go into the “configuration” -> “axis setup” -> “spindle” tab. This is the screen that you will use to set the laser up as a “spindle”.

uccnc-laser-setup

Image

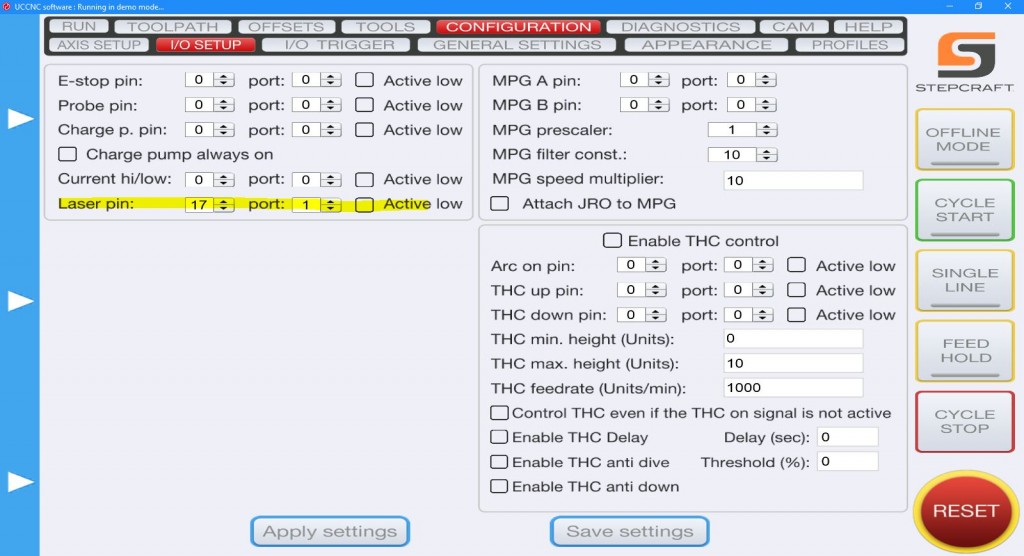
In the “Configuration -> I/O Setup” page, make sure to set the “Laser Pin” like below:

laserpin

Image

Now then it then states

For ON/OFF relay control:

Uncheck the box on “PWM spindle” and check the “Spindle relay output enabled”.
Set M3 relay pin to “1” and port to “1”. This will map to the stepcraft Pin 13 that you have connected to the laser driver.
You can now turn on and off your laser with the “M3” command. Test it on the run screen by pushing the clockwise spindle button.

For PWM control:

Check both the boxes for “PWM Spindle” and “Spindle relay output enabled”.
Set M3 relay pin to “1” and port to “1” in the spindle relay section.
Set PWM pin to 17.
Set your Frequency to a number you want. 100 or 500 is pretty good. Anything under 5000 will work.
Set minimum duty % to 0.
Set maximum duty % to 100.
Now you will have control over the power using the command:

M3 SXXX

where the “XXX” is a number between 0 and 100.

so when it arrives in about a week or so ....does this look about right

Thanks Gazza
Gazza
 
Posts: 33
Joined: Tue Dec 19, 2017 7:33 pm
Location: Hiding in me work shop playing in England

PreviousNext

Return to Ask a question from support here

Who is online

Users browsing this forum: No registered users and 28 guests