Page 1 of 3

My first PCB using UC300ETH and UCCNC

PostPosted: Fri Dec 02, 2016 1:31 pm
by A_Camera
Subject says it all. Last night I made my first PCB using the above. OK, nothing special, but considering the number of people having issues with milling PCB prototypes I thought I'll write about it.

Image

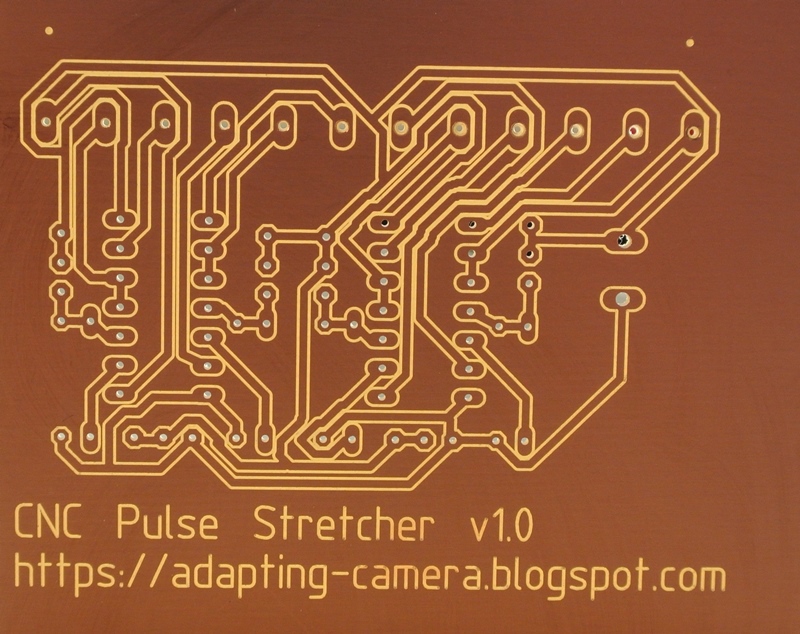
Anyway, making a long story short, the PCB turned out really nice, no additional work needed with cleaning the tracks or anything at all. Traces are beautifully milled follow what's been routed with the auto router of Eagle. Manually routing or double sided PCB would have created a more beautiful art work, but it's good enough. Due to lack of 1.2mm high speed PCB drill, I used a simple twisted drill, which was a mistake. It slide into the collet after a few holes, so I have to drill those missed holes manually on a pillar drill. I didn't use the auto leveling plugin mainly because I did not like the limitations that the probing area is not definable. Perhaps I missed something, but it seems to be necessary for it to start at XY = 0 which is wrong, since that is the edge of the PCB and it seems to do the first probing along that line, from X0 to Xmax, which in this case is X-100. Probing along X0 is totally wrong in this case, so I found it useless. Also, since my table is leveled and the PCB is pretty small, I decided to skip auto leveling and try without and I am glad I did that. Like I said, perhaps I missed something, but for now it does not matter.

Some details about the machining data:

Spindle speed: 22,000rpm
Cutter: 30 degree 0.2mm V-bit engraving cutter
Drill bits: high speed PCB drills, 0.6mm and 1.2mm
Maximum milling depth: 0.07mm
Isolation distance: 0.2375mm
PCB type: fibre glass 1.6mm, FR4 with 35um copper layer
Feed rates: 450mm/min first pass, 650mm/min second pass
Z plunge rate for drilling: 250mm/min

If anybody is interested in more details please visit my blog.

https://adapting-camera.blogspot.se/2016/12/making-pcb-with-my-upgraded-diy-cnc.html

Re: My first PCB using UC300ETH and UCCNC

PostPosted: Thu Dec 08, 2016 6:08 pm
by A_Camera
OK, no big interest for this here, but I also made a video.


Re: My first PCB using UC300ETH and UCCNC

PostPosted: Fri Dec 09, 2016 9:34 am
by Robertspark
I'm interested (but busy on other things)

Re: My first PCB using UC300ETH and UCCNC

PostPosted: Fri Dec 09, 2016 1:00 pm
by A_Camera
Robertspark wrote:I'm interested (but busy on other things)

Thanks. Don't worry, no excuses needed for not commenting, but in general, I don't think that there are many people here who make or plan to make PCBs with their machine. Even I was pretty negative to that process before I made the upgrade, but now changed my mind. I think a well made CNC can be used pretty efficiently. It can many times require less time to make a PCb this way than through chemical etching, especially if you calculate drilling time as well as handling times needed to buy, use, clean after and so on, in other words, if the whole process is taken care of. Of course, milling a large PCB takes a long time, much longer than chemically etching, on the other hand drilling the same PCB manually (which you must do if you etch chemically) takes forever and results in terrible accuracy and a lot of manual work. Automated drill process is worth a lot... :)

Besides, during the time my machine is milling the PCB I can do other things, so it doesn't actually matter how long a PCB takes to mill. Also, finally I did some more Z speed tests also and concluded that I can speed up Z also, so as of now I am using 8000mm/min and 700mm/s/s even on the Z, so drilling is impressive to watch, I really like it.

Re: My first PCB using UC300ETH and UCCNC

PostPosted: Fri Dec 09, 2016 1:15 pm
by cncdrive
Josef, the result you got is really nice, congrats, when I first looked at the picture you posted I thought it was just a rendering of a PCB design software and then noticed the different background colors in the drills is when I realised it is an actual PCB. :)

We've made lots of prototype PCBs earlier, about 10-15years ago for our own projects, so I know how hard it is to get a nice result like that.

Re: My first PCB using UC300ETH and UCCNC

PostPosted: Fri Dec 09, 2016 2:10 pm
by A_Camera
cncdrive wrote:Josef, the result you got is really nice, congrats, when I first looked at the picture you posted I thought it was just a rendering of a PCB design software and then noticed the different background colors in the drills is when I realised it is an actual PCB. :)


Thank you Balázs.

Both the top picture and the starting image of the video are pictures of the actual PCB. The top picture is a back lit photo in daylight, the video picture is held against the video LED panel, and because it is a very strong light, the copper surface looks black, severely underexposed. I always look at and check the PCBs I make this way because it is easy to see broken or shorted tracks.

cncdrive wrote:We've made lots of prototype PCBs earlier, about 10-15years ago for our own projects, so I know how hard it is to get a nice result like that.

For me it's the opposite... I stopped etching chemically about 15-20 years ago when I realized that the chemical fumes eat up my tools, causing too much rust and that it is really not healthy. One of the reasons why I wanted to build a CNC was actually to be able to make PCBs with it. My first version was a bit slow so I was not very active in making PCBs with it, but now that my upgrade is basically done and the speed is very good I know that I will make a lot more.

In my opinion, a CNC is a perfect tool for low series PCB making, much better than chemically etching and manually drilling. Of course, it is not an option for anything else than dual layer cards, and also not an option if like you, producing and selling in volumes, but for a hobby project, even if it is sold in low volumes, it is very practical.

Re: My first PCB using UC300ETH and UCCNC

PostPosted: Fri Dec 09, 2016 2:17 pm
by Robertspark
I've seen someone doing it with a laser with masking tape with etching too...

I use RS components designspark to do my schematic + pcb designs, don't know why but I struggle with eagle.

really the stuff I'm sure most people do is just prototype one off's that don't justify made pcb's especially if you have a mill sat their idle for 90% of the time.

Re: My first PCB using UC300ETH and UCCNC

PostPosted: Fri Dec 09, 2016 2:27 pm
by A_Camera


I just noticed an error in the video. I mill the first pass at 0.04mm depth and the second pass at 0.07mm and nothing else. In the video I wrote that I mill the first pass at 0.4mm and the second at 0.7 and that is just too much for PCB milling. The copper layer is just 0.035mm, so there is no need to mill deeper but I double that value to be on the safe side, however, making it 20 times deeper than necessary would be crazy.

Re: My first PCB using UC300ETH and UCCNC

PostPosted: Fri Dec 09, 2016 4:30 pm
by Robertspark

Re: My first PCB using UC300ETH and UCCNC

PostPosted: Fri Dec 09, 2016 5:02 pm
by A_Camera

What do you mean? I am not using tape for anything other than fixing the PCB to the table. No paint involved at all in my case.

In the link the PCB is chemically etched. Yes, etching chemically is faster, but NOT if you count the time it takes to handle the chemicals, prepare the card PLUS manually drilling, especially a large PCB takes a lot of time to drill, and doesn't actually look as nice. I never managed to chemically etch as nice as a CNC can mill and drill. Besides, the vapours are more hazardous, both during the pre-work (painting and handling the chemicals), the laser "milling" and the etching than the dust produced during milling. The dust stays on the PCB if a V-bit is used, even with my air cooled spindle at 22k rpm. Of course, a dust shoe is recommended.